Tame.exe adds speed and display options for WPDOS | Using Tame: basic techniques | Fine-tuning Tame settings | Fine-tuning Tame display fonts | Tame and the Windows clipboard | Use the mouse | Mode mono or black-and white | Modify Tame's menu | Separate settings for separate shortcuts | Use Tame to display the euro symbol | What Tame looks like | Saving screen images to HTML | Troubleshooting | Help! My keyboard doesn't have a Windows key! | Use Tame settings for WPDOS launched from Explorer menu | What do "text mode" and "graphics mode" mean? | Home page
Read this page only if you have 32-bit Windows! If you recently bought a Windows 7, 8, or 10 computer, you almost certainly have 64-bit Windows and should ignore this page. If you don't know whether your new computer uses 32-bit or 64-bit Windows, then you have 64-bit Windows!
You can and should use Tame if you have 32-bit Windows, not 64-bit Windows! Tame has no effect - and will not even run - under 64-bit Windows nor with any method of running WPDOS under 64-bit Windows. If you recently bought a Windows 7, 8, or 10 computer, you almost certainly have 64-bit Windows.
Important note: If you find that Tame 6.0 causes WPDOS to run slowly or causes macros to "stall," you may want to experiment with the earlier version, Tame 5.0, which remains available. Some visitors to this site report better success with the earlier version than with the current one. For information on Tame 5.0 (and the obsolete version 4.5e), see a separate page on those older versions.
Tame under 32-bit Windows 10: Whenever Windows 10 updates itself to a new version, you will need to reinstall Tame. Your existing settings will continue to work, but you must run the installer once after Windows updates itself to a new version number (e.g. 2004, etc.).
Problem alert: If and only if you find that you cannot open an MS-DOS prompt with the current version of Tame installed, or if you find that some programs downloaded from this site produce "NTVDM" errors, perform the following steps. Ignore these instructions if you have not actually encountered these problems!
The Tame utility from Tamedos.com is a US$20 program that transforms WPDOS under 32-bit Windows NT, 2000, XP, Vista, Windows 7, 8 or 10 so that it runs at the fastest possible speed; displays italics, underline, superscripts, and bold in a DOS window; runs with sharp, clear Windows graphics fonts in full-screen mode; allows copy and paste directly to and from the Windows clipboard; and can change the number of lines and columns in a WPDOS window when you use the mouse to resize the window or choose preset sizes from a menu. It can also perform many other functions that enhance WordPerfect and and other DOS applications.
This is the only third-party software that I recommend without reservation to all users of WPDOS under Windows NT, 2000, XP, Vista, Windows 7, or 32-bit Windows 10. A 30-day free trial version is available for download, and you may prefer to experiment with the program before buying it.
Why Tame is necessary: WordPerfect and other DOS applications perform slowly when run under modern Windows versions because the DOS-emulation software built into these Windows versions (the VDM or "Virtual DOS Machine") is notoriously badly-written. Among the many problems that afflict DOS software under Windows are sluggish response to keystrokes, slow scrolling, slow performance in general, and an internal clock that lags behind the clock in Windows, so that the time reported by DOS applications can fall hours behind the time correctly reported by Windows.
Installation advice: Tame may be more reliable if you enable an advanced option that lets it work in more parts of Windows than it does by default. To use this option, edit your Config.nt file as explained elsewhere on this site, and remove the word REM at the start of the line contains the word DOSONLY, so that the line includes only DOSONLY. Warning: This option will disable the Clip macros described elesewhere on this site, and may cause more problems than it solves; experiment with all the features that you use in WPDOS after changing this setting to see whether you want to keep it.) Remember, you need to edit your Config.nt file as described in the link above; you will not find this line in your Autoexec.nt file! Don't be clueless! Edit the correct file!
Very important installation note for Smartype users: The Tame installation program adds to your Autoexec.nt file a line that loads Tame. If you have followed the instructions for installing Smartype found on this site's medical transcriptionist survival guide, you may already have added a line that loads Smartype (with instructions that include "lh st"). If so, you must now edit your Autoexec.nt file, and move the line that loads Smartype below the line that loads Tame. (Help! I can't find or edit my Autoexec.nt file!) The line that loads Smartype must be at the very end of the Autoexec.nt file.
Note: The Virtual DOS Machine (VDM) in Windows did not have to be as badly-written as it is. The superb DOS emulator in the old OS/2 operating system (originally a joint project of Microsoft and IBM) was written by a team of engineers at Microsoft headed by Ben Slivka, who was still working for Microsoft at the time when Windows NT was written. Microsoft had the resources to make an VDM that would work well under Windows NT, but didn't use them.
After installing Tame, start WordPerfect from a desktop shortcut (as you probably do normally). Do not start WordPerfect from a command prompt or batch file; Tame will not work properly unless you are expert enough to know how to make it work. Remember: Until you understand how to manage Tame, start WordPerfect from a desktop shortcut.
When WordPerfect is running, press Alt-Enter to make sure that it is running in a window, not in full-screen mode. When WP is running in a window, press Alt-Spacebar to open the Tame System menu (or left-click on the icon at the upper left of the window) and explore some of the options.
Serious warning: Tame will not work properly if you have changed the name of your WP.EXE or WP.COM file! If you have changed the original name WP.EXE to WP51.EXE or WP62.EXE or WHOOPPEE.EXE or anything else, change it back to WP.EXE! (If you have changed the name from WP.COM to anything else, change it back to WP.COM!) Do not ignore this warning!
Screen font settings: Press Alt-Spacebar to open the Tame System menu (or click on the icon at the upper left of the window). Use View | Base Font, Size Color | Primary Font to change the screen font (the default choice, Lucida Console, is probably the best; choose a point size comfortable for reading; and see the separate section below for further details). Remember that the font you choose is the font used by Tame to display text; it has absolutely no effect on the font that WPDOS uses for printing! To change the printer font, use Ctrl-F8 in WPDOS.
Important note: When Tame is running in its full-screen mode, it ignores changes that you make to the Primary Font menu; to change font size when in full-screen mode, press Alt-Enter to return to windowed mode, change the font size, and then press Alt-Enter again to return to full-screen mode.
Cursor settings: Press Alt-Spacebar to open the Tame System menu (or left-click on the icon at the upper left of the window). Use View | Cursor Options and select any settings you prefer; you can stop the cursor from blinking by removing the checkmark next to Blink Text Cursor. I recommend that you select (add a checkmark to) the two options that hide the text cursor while busy and that hide the mouse cursor while typing. Note that you cannot set the cursor color; the cursor will always be a color that contrasts with the window background color.
Resize the WPDOS window and add rows and columns to the display: (Important warning: In order for Tame to change the number of rows and columns in WP when you resize its window, you must have the Text Screen Type set to "Auto Selected". In WPDOS 5.1, choose Shift-F1, 2, 3, and choose 2 - Auto-Selected. In WPDOS 6.x, use Shift-F1, 2, 2, 1, and choose 2 - Auto Select.) You may use the System menu (use
Alt-Spacebar, or click the icon at the upper right of the window) to select a preset screen size for the WPDOS window; these screen sizes are listed on the second column of the Tame menu. Or use the mouse to drag the bottom edge of the window to add more lines of type to the WP screen; you can also make the screen wider by dragging the left edge, or resize the screen by dragging a corner; or you can select Size from the Tame System menu and use the cursor to resize the window; press Enter when the window is the size that you prefer. (Note: If oddly-colored squares appear at the lower right of a WPDOS 5.1 window when resizing, ignore them, or press Shift-F3 twice to refresh the screen.)
If you have a wheel mouse: Tame adds wheel-mouse support to WordPerfect for DOS, as follows (but your system may respond differently, depending on your mouse settings in WordPerfect and Tame):
Tame includes special settings for WordPerfect that Tame does not offer with other DOS-based applications. For example, you can press Alt-Spacebar to open the Tame System menu (or click on the icon at the upper left of the window), and use the list of screen sizes in the second column of the menu to select the screen size you prefer, or to switch to Tame's graphic-based full-screen mode. You can also use Full-Screen Layout Toggle, or simply press the Windows key and Enter (Win+Enter). (Help! My keyboard doesn't have a Windows key!) Note that Alt-Spacebar opens the Tame System menu in full-screen mode just as it does in windowed mode.
Highly recommended technique: Use the System menu to switch to the VGA Portrait screen layout (80 columns by 50 rows) and then press Winkey+Enter (or Alt-Enter) to switch to full-screen layout.
If the WordPerfect screen gets "confused" with unwanted characters or other artifacts, press Shift-F3 twice to toggle to another WP window and then back again; this should clear up any problems.
Toggle the Tame status bar: To toggle the Tame status bar, press the Windows key and S (Winkey+S). (Help! My keyboard doesn't have a Windows key!)
Under Windows XP, Tame runs even when WPDOS is in its traditional full-screen mode. If you need to use WPDOS in traditional full-screen mode, perhaps because you prefer its 512-character font option, or because you have a custom VGA screen font file (FRS file), or for any other reason whatever, you should still install Tame. Simply open the desktop shortcut that you use to run WPDOS, go to the Screen tab, and select Full-Screen instead of Window. When you run WPDOS, you will not get Tame's screen features, but Tame's resource-management features will continue to operate. (Remember that traditional full-screen mode is not available at all when running WPDOS under Vista or Windows 7, 8, or 10!)
See the remaining sections on this page for details on further customizations.
For the greatest flexibility with Tame and WPDOS, you must modify some settings files. After running WPDOS at least once with Tame, use Alt-Spacebar to open Tame's System menu; choose Default Options | User Options | Edit Options for this Application. The file WordPerfect.app.v51.tam (if you are running WPDOS 5.1) or WordPerfect.app.v6.tam (if you are running WPDOS 6.x) opens in your default text editor (typically Notepad.exe), and you can adjust the way Tame works with WPDOS. If you ever want to restore the initial settings, you can find the original version of this file in the C:\Program Files\Tame 6.0\Settings\Templates directory (the original version of WordPefect.app.v6.tam in this folder is named WordPerfect.app.tam)
When editing this or any other Tame settings file you turn options on by removing the "comment" marker ( ;* ) at the beginning of the relevant line; to return to the program's default setting, add the comment marker (or any series of characters that begins with a semi-colon) at the start of the relevant line. Remember that if more than one line controlling the same feature is uncommented, Tame will use the lowest such line in the file.
To prevent the mouse pointer from appearing anywhere in the WordPerfect window, add the following line anywhere in the settings file described above; it may be most convenient to add the line at or near the top of the file:
/AppConfig MouseInput = off
Save the file and restart WordPerfect.
Read this paragraph and be absolutely certain that you understand it! This section refers only to the fonts that Tame uses to display text on your screen. Any font settings that you select on the Tame menu will have no effect - I repeat, absolutely no effect at all - on the fonts that WPDOS uses for printing. If, like many visitors to this site, you simply refuse to believe that I really meant what I wrote in the preceding sentence, I will write it out again in the hope that you may at least consider believing it: Any change that you make to Tame's font settings will have absolutely no effect on the printer font that WPDOS uses for printing. The settings described in this section apply only to the fonts that you see on screen when WPDOS is in its ordinary text mode. WordPerfect will never detect and never use the screen font settings that you make in Tame. Are you absolutely certain that you understand this? Are you really and truly certain that you understand it? If so, read on. If not, please study this paragraph again and again and again until you are one-hundred-percent certain that you fully understand this essential point - and please study the section on "text mode" and "graphics mode" elsewhere on this page.
To change the font that Tame uses for displaying text, press Alt-Spacebar to bring up the Tame System menu (you can use this keystroke even if Tame is in its graphics-based full-screen mode). Choose View | Text Display | Font, and select the font and point size that you want Tame to display. By default, Tame uses Lucida Console, which works extremely well. If you want to see the same font that you are probably accustomed to seeing in DOS command windows, choose Terminal, and select the 9 point size. Remember that WordPerfect will not use Lucida Console as a printer font! Lucida Console is only and exclusively the font that appears on screen in the WPDOS window! Again, if you don't understand this, then study the paragraph above until you do!
To view bold, italic, underline, and some other font attributes on WPDOS text screens, close WPDOS, then reopen it, and then, before you do anything else (in other words: do not open a file!), use Alt-Spacebar to bring up Tame's System menu, then choose View | Setup Text Style Colors. Then proceed as follows
To modify the background pattern that WPDOS 6.x displays (for example) behind messages such as "Spell Check Completed", use Alt-Spacebar to bring up Tame's System menu, choose View | Text Display | Fill Pattern Characters and choose the pattern that you prefer.
Tame makes it easy to copy and paste text between WPDOS and the Windows clipboard. You can, of course, copy and paste text between WPDOS and Windows applications in the same way that this is done when Tame is not running. With WPDOS open in a window, press Alt-Space, then Edit | Mark Screen Text, and move the cursor to select the text you want to copy; then press Alt-Space again, then Edit | Copy to Clipboard. The copied text can then be pasted into any Windows application. (Note: If, when running Tame, you use Alt-Spacebar, then Edit | Edit Options, and choose Quick Copy, your selected text will be copied to the clipboard as soon as you mark it, without requiring the Edit | Copy to Clipboard action.) To paste text from the Windows clipboard into WordPerfect, use Alt-Spacebar, then Edit | Paste; immediately after "Paste" on the menu will be displayed either the first few words of the text that will be pasted (or, for reasons that I don't understand) the number of characters in the text).
For copying from WPDOS to the Windows clipboard, I suggest that you install Robert Holmgren's macros for copying, cutting and pasting to and from the Windows clipboard but use only the Copy (and perhaps the Cut) macros, which you can assign to Alt-C (and Alt-X) in your WPDOS keyboard layouts. The advantage of these macros over Tame's method is that the macros allow you to select text using WPDOS's standard blocking method, including text not currently visible on screen. If you use Tame's copying method, you can only copy text that is visible in the current window.
Alternatively, starting with Tame 6.0d (not earlier versions), you can use Tame's built-in ability to paste from the Windows clipboard. (Note that this method may produce unpredictable results in some cases, so you should experiment with it.) To add this feature, start WPDOS; if and only if it is running full-screen, press Alt-Enter so that it runs in a window. Open the system menu by pressing Alt-spacebar or left-clicking on the icon at the far left of the Tame titlebar. Choose Default Options | User Options, and then click on one of the first three items, depending on whether you want to use this pasting method in all DOS applications (Edit Default User Options), only under WordPerfect (Edit Options for This Applcation), or only under the copy of WordPerfect launched by the current shortcut (Edit Shortcut Options - filename.PIF). When the options settings page open in Notepad, add this line anywhere in the file:
/MacroDefine onkey="Shift-Home" Options=(/SendInput PASTE)
Save the file; close WPDOS; reopen WPDOS. You can now paste from the Windows clipboard by pressing Shift-Home. You can of course experiment with other key combinations; study other Tame setting files for the correct syntax for identifying keystrokes.
WordPerfect 5.1: Do not expect the mouse to behave reliably or predictably when used with WPDOS 5.1 and Tame. The following technique may or not work correctly on your system. In WPDOS, press Shift-F1, Mouse, Type, and make certain that Mouse Driver (MOUSE.COM) is the selected mouse option. (If, instead, you want to prevent the mouse from interacting with WPDOS, select some other driver, perhaps Microsoft Bus Mouse, so that WPDOS does not detect mouse actions.) After exiting to the editing screen, again press Shift-F1, Display, Text, Auto-Select; you may also need to select Display, Graphics, Auto-Select (to select the VGA graphics driver), but you may experiment with this. Then set your Tame options: press Alt-Space, choose Keyboard and Mouse Input, Mouse, and make sure that Allow DOS to Access the Mouse is checked. From the Tame menu, you may also need to choose Default Screen Layout 80x25. After this, the mouse may act as it does when WPDOS 5.1 runs in full-screen DOS, or it may not.
WordPerfect 6.x: In WPDOS, press Shift-F1, Mouse, Type, and make certain that Mouse Driver (MOUSE.COM) is the selected mouse option. (If, instead, you want to prevent the mouse from interacting with WPDOS, select some other driver, perhaps Microsoft Bus Mouse, so that WPDOS does not detect mouse actions.) Then set your Tame options: press Alt-Space, then Keyboard and Mouse Input, and make sure that Allow DOS to Access the Mouse is checked. You should now be able to use the mouse in a WPDOS 6.x window exactly as it it can be used in full-screen DOS.
Tame makes it possible to approximate WPDOS's appearance in the monochrome mode that was available in old DOS computers. Two methods are available: (1) set Tame to true monochrome mode, so that WPDOS acts as if it were using a monochrome monitor, or as if were running under DOS after you entered the command MODE MONO; or (2) set Tame to use a black-white-gray color palette instead of its normal blue-white-and-other-colors palette. Here are the details of each.
(1) To run WPDOS in true monochrome mode: After running WPDOS at least once with Tame, use Alt-Spacebar to open Tame's System menu; choose Default Options | User Options | Edit Options for this Application. The file WordPerfect.app.v51.tam (if you are running WPDOS 5.1) or WordPerfect.app.v6.tam (if you are running WPDOS 6.x) opens in your default text editor (typically Notepad.exe). Add the following line near the top of the file:
/system setvideomode=7
Then save and close the file. Then, press Alt-Spacebar to open Tame's system menu; choose Default Opions | Save View Options Now. Then exit WPDOS.
Next, go to your user folder; open your Documents (or My Documents) folder; open the Tame 6.0 folder, then the Saved Options folder, and use your Windows text editor to edit the most-recently-saved .view.tam file, which will probably be WordPerfect.pif.view.tam (or, if your WP shortcut is not named "WordPerfect", you should edit the .view.tam file whose name that begins with the actual name. (Before you open the file, make a backup copy of it!) Near the foot of the file, you may find lines that begin with "; Tame Console Fonts" and "; Tame Console Attribute Display". If those lines exist, delete them, and replace them with these lines:
; Tame Console Fonts
/TextStyle Id=Default Face="Lucida Console" Weight=400
/TextStyle Id="wp-fine" Face="Lucida Sans Unicode" XSizePercent=90
/TextStyle Id="wp-large"
/TextStyle Id="wp-vlarge"
; Tame Console Attribute Display
/AtrDisplay ForAtr=7 NameThisColor="Normal Text"
/AtrDisplay ForAtr=1 FgColor="Light-GraY" UnderLine=1 TextOnTop=on
/AtrDisplay ForAtr=2 FgColor="Light-GraY"
/AtrDisplay ForAtr=9 DispColor="Normal Text" Style=Bold UnderLine=1 TextOnTop=on
/AtrDisplay ForAtr=#0F DispColor="Normal Text" Style=Bold
/AtrDisplay ForAtr=#70 Style=Bold
Then save and close the file, and restart WPDOS to use monochrome mode. (Note: These settings should work correctly in both WPDOS 5.1 and WPDOS 6.x; if you find anything that seems wrong, please let me know and I will fix it.)
(2) To use a black-and-white color palette: Run WPDOS under Tame; press Alt-Spacebar to open Tame's system menu; choose Default Opions | Save View Options Now. Then exit WPDOS. go to your user folder; open your Documents (or My Documents) folder; open the Tame 6.0 folder, then the Saved Options folder, and use your Windows text editor to edit the most-recently-saved .view.tam file, which will probably be WordPerfect.pif.view.tam (or, if your WP shortcut is not named "WordPerfect", you should edit the .view.tam file whose name that begins with the actual name. (Before you open the file, make a backup copy of it!) Near the foot of the file, you may find lines that begin with "; Tame Console Fonts" and "; Tame Console Attribute Display". If those lines exist, delete them, and replace them with these lines:
; Tame Console Fonts
/TextStyle Id=Default Face="Lucida Console" Weight=400
/TextStyle Id="wp-fine" Face="Lucida Sans Unicode" XSizePercent=90
/TextStyle Id="wp-small" Face="Lucida Sans Unicode" XSizePercent=95
/TextStyle Id="wp-large" Face="Lucida Sans Unicode" XSizePercent=110
/TextStyle Id="wp-vlarge"
; Tame Console Attribute Display
/AtrDisplay ForAtr=3 FgColor=White
/AtrDisplay ForAtr=4 FgColor="Light-GraY" Style=Bold
/AtrDisplay ForAtr=#10 BgColor="Light-GraY"
/AtrDisplay ForAtr=#17 BgColor=Black
/AtrDisplay ForAtr=#1E FgColor="Light-GraY" BgColor=Black Style=Italics
/AtrDisplay ForAtr=#1F BgColor=Black
/AtrDisplay ForAtr=#30 FgColor="Light-GraY" BgColor=Black LinesThroughCenter=1
LineWidth=1 TextOnTop=on
/AtrDisplay ForAtr=#31 FgColor="Light-GraY" BgColor=Black UnderLines=2
TextOnTop=on
/AtrDisplay ForAtr=#34 FgColor="Light-GraY" BgColor=Black SmallCaps=on
/AtrDisplay ForAtr=#35 FgColor="Light-GraY" BgColor=Black Style=Bold
/AtrDisplay ForAtr=#47 FgColor=Black BgColor=White
/AtrDisplay ForAtr=#4F FgColor=Black BgColor=White Style=Bold
/AtrDisplay ForAtr=#50 FgColor="Light-GraY" BgColor=Black Style="wp-fine"
/AtrDisplay ForAtr=#57 BgColor=Black Style="wp-small"
/AtrDisplay ForAtr=#60 FgColor=White BgColor=Black Style=Italics
/AtrDisplay ForAtr=#71 FgColor="Light-GraY" BgColor=Black UnderLine=1
TextOnTop=on
/AtrDisplay ForAtr=#74 FgColor=White Style=Bold
/AtrDisplay ForAtr=#75 FgColor="Light-GraY" BgColor=Black Style=Superscript
Then save and close the file, and restart WPDOS to use a black-and-white color palette. (Note: These settings should work correctly in both WPDOS 5.1 and WPDOS 6.x; if you find anything that seems wrong, please let me know and I will fix it.)
You can add items to the menu that Tame System menu that appears when you use Alt-Spacebar. Begin by using Alt-Spacebar to open the menu; choose Default Options | User Options | Edit Options for This Application . The preferences file opens in your default text editor (typically Notepad.exe).
You can modify the WPDOS System menu (Alt-Spacebar) by adding options for changing the size of the screen font. (Note that these changes only apply to the screen font, not to the printer fonts.) Find the section of the file that begins "; Add some screen layouts", and then move your cursor to the blank line after "/MacroDef id="_Configure W&P Colors for Font Display" Menu=1 ". Press Enter once or twice to add some blank lines, and insert the following text in the file (use Windows' copy and paste function):
; Add some standard text sizes to the context menu
/MacroDef id="_sep_scfont" Menu=#1
/MacroDef id= "Text Size 1&0 pt" Menu=#1 Options="/TameConsole TextHeight
= 13 TextWidth = 0"
/MacroDef id= "Text Size 1&1 pt" Menu=#1 Options="/TameConsole TextHeight
= 14 TextWidth = 0"
/MacroDef id= "Text Size 1&2 pt" Menu=#1 Options="/TameConsole TextHeight
= 15 TextWidth = 0"
(Note that the TextHeight setting near the end of the line should be three points larger than the Text Size that you want to display on the menu. Slightly confusingly, you can use either TextSize or TextHeight at the end of the line, and the result will be the same.)
Note also that, in the above text, the character that follows an ampersand (&) will be underlined on the menu and used as an accelerator key. You can add a separator line above any menu item by adding an underscore character (_) immediately after the opening quotation mark immediately after id=.
When you finish editing, save the file, close Notepad, close WPDOS, and then restart WPDOS. Your additional menu items will now appear.
In a similar way, you can modify the list of screen layouts displayed in the second column of the WPDOS System menu by editing this file:
C:\Program Files\Tame 6.0\AppSupport\_Common\Option\ScreenLayoutMenu.Option.tam
Make a backup copy of the file; study its contents, and either modify the existing items or add new ones.
Tame can save separate settings files for use with individual shortcuts. This means that you can create multiple shortcuts (or Start Menu items) for running WPDOS, each with different Tame settings. These files are stored in your "My Documents" folder, inside the Tame folder. You can create a shortcut options file as follows: copy your existing WPDOS shortcut, and give the new copy a distinctive name; then launch WPDOS from the shortcut, and use Alt-Spacebar to open the System menu, and choose Default Options | User Options | Edit Shortcut Options - [name of the current shortcut file]. The newly-created options file will open in Notepad (or whatever program is set up on your system to edit plain text files); you do not need to change it; simply close Notepad (or whatever program opens the file). You can make changes in the file at any time.
For example, if you want to run WPDOS in monochrome, add this line to the top of its shortcut options file:
/System SetVideoMode = 7
(See a separate section of this page for more on monochrome and black-and-white display modes.)
Tame can send keystrokes to a program when it opens. For example, if you use WPDOS 6.x with its top-line menu, you could have the current date inserted at the top of a file when you launch WP by adding this line to a Tame shortcut options file:
/SendInput alt="T" text="d" ENTER
Tame provides a much simpler method of displaying the euro symbol in WPDOS than those described on this site's euro page. To display the euro on screen in WPDOS, when using the graphics-based Tame console, do the following:
(1) Using the methods on this site's euro page, choose one or more methods of printing the euro symbol. Users of WPDOS 6.x should begin with method (1) on the euro page and perhaps also use method (2) or some other method; users of WPDOS 6.x whould consider methods (2) and (7) and perhaps others as appropriate. When you are absolutely certain that you can print the euro symbol from WPDOS, proceed with the following steps.
(2) Use Alt-Spacebar to open Tame's System menu and choose Default Options | User Options | Edit Options for this Application. When the file C:\Program Files\Tame\Settings\WordPerfect.app.tam opens in your default text editor (typically Notepad.exe), search for the words "euro symbol"; find a line below it that begins like this:
;; /CharDisplay DisplayUnicode=#20AC Match=#80
Remove the semi-colons from the start of the line to "uncomment" the line and make it active, and change #80 to #FF, so that the line looks like this (remember: the semi-colons have been removed, and #80 has been changed to #FF):
/CharDisplay DisplayUnicode=#20AC Match=#FF
Save the file. Do not exit WPDOS.
(3) In WPDOS, create a file that you will save in your WP program directory (typically C:\WP51 or C:\WP61 or some similar name) with the name WP9999.WCP. The file should contain only the following line (the number 255 followed by a space followed by 4-comma-72):
255 4,72
Save the file. Exit WPDOS.
(4) Modify the desktop shortcut that runs WP so that the Cmd line field on the Program tab includes this command-line switch (which can be added to any other command-line switches that follow WP.COM or WP.EXE):
/cp=9999
This switch can also be added to a batch file that runs WPDOS, or to any other setting that applies when WPDOS is started.
(5) Launch WPDOS from the shortcut that you modified in the preceding step. When you type WP character 4,72 (using any keyboard shortcut to which 4,72 has been assigned), the euro should appear on screen, and, if you performed step (1) correctly, it should print when you print your document.
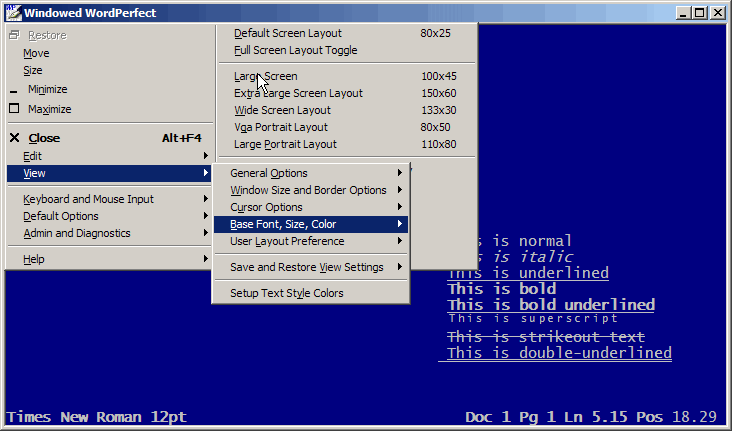
This is an example what WPDOS looks like under Tame. (The menu of the current version may be slightly different from the menu shown in the picture!) The screen font shown here is the Tame default font, Lucida Console, although this can be changed to any other Windows font from the View/Base Font, Size, Color menu; monospaced fonts produce the best results. Note that although Lucida Console is the screen font, the printer font (in this case, Times New Roman) is not the same as the screen font, and has no relation at all to the screen font.
Unlike standard screen-capture programs that save images of the screen in graphics formats, Tame can save "screen shots" (images of the current screen) in the form of HTML files. This provides many advantages. HTML files are much smaller than graphics images; text in the screen image can be searched with a browser's Find function; and spelling and other typographic errors in the text on screen can be corrected by editing the HTML code. Tame's HTML screen-captures can be used in training material, tutorials, and many other purposes.
Before capturing a screen image in Tame, first set HTML as the default format for saved files; use Alt-Spacebar to open Tame's System menu, then Edit | Screen Capture Options | Save File Options, and choose HTML. Then, to save a screen image as an HTML file, use Edit | Save To File; you will be prompted for a filename and location.
Note: When Tame saves an HTML screen capture, it also creates (or rewrites) a CSS file that determines the formatting; if you move or copy the HTML file, you should also move or copy the CSS file that was created at the same time.
Error: "TameVdd.dll error on installing." If you see this error message, then copy the file TameVdd.dll from c:\ProgramFiles\Tame to c:\Windows\System32 (do not copy the file to the Desktop or anywhere else other than the directory I told you to use). If Windows is not on drive C: in your system, the replace c: with whatever the drive letter of the drive with Windows may be. Restart your computer if Tame doesn't start correctly after you copy the file. Do not even think about copying this file unless you see the error message quoted at the start of this paragraph! I mean it! You will cause problems; you won't solve them! Don't try to be clever! Don't ask me to help you out if you insist on ignoring this warning!
If you experience a problem with Tame, you may write to support{-at-}tamedos{-dot-}com to report the problem. Be sure to include a "trace" file that records essential information about Tame's operation. To create a trace file with Tame 6.0, use Alt-Space (or the upper-left-hand icon), then Admin and Diagnostics, then Trace Diagnostic Information for This Session.
After you close WPDOS, you can find the trace file in a folder whose location depends on your Windows version. Under Windows XP, you will find it in:
C:\Program Files\Tame 6.0\LogFiles
Under Vista and Windows 7, 8, or 10, you will find it in :
C:\Users\yourusername\AppData\Local\VirtualStore\Program Files\Tame 6.0\LogFiles
but, of course, substitute your actual user name for "yourusername".
The file will have a name that resembles WP-1111.TraceRing.tdt (but with different letters and numbers at the beginning of the name).
Attach this file to the e-mail that you send to the support address; if you know how to compress a file into a ZIP archive, compress the trace file into a ZIP in order to save space, and send the ZIP file that contains the trace file.
Note: If an application will not even open with Tame installed, you will not be able to use the instructions above to create a trace file. Instead, go to C:\Program Files\Tame 6.0\Settings and use Notepad to edit the Tame.ini file. Find the section headed "Log files and diagnostics"; in that section, find the line that reads "; Trace Startup = T"; remove the opening semi-colon and space; save the file. (Be careful: do not change the similar line near the end of the file, in the section headed "shortcut-specific values"; change the line in the section headed "Log files and diagnostics"!!) Tame will now automatically save a trace file. When you have the trace file that you need, edit the Tame.ini file again and put back the semi-colon and space at the beginning of the "Trace Startup = T" line.
Some keyboards (and almost all the best ones) lack the "Win" (or Windows) key generally found between the left Ctrl and left Alt keys. When you press the Win key, the Start menu opens; if you do not have a Win key, you can press Ctrl-Esc to bring up the Start menu, but Ctrl-Esc cannot be used together with other Win key combinations such as Win+D to open the desktop, Win+E to open My Computer, Win+M to minimize all windows, and other combinations.
Fortunately, you can use a keyboard-remapping utility to make another key perform the function of the Win key; I use Scroll Lock for this purpose. To remap keys, I use TradeKeys from PC Magazine; this utility must be purchased, but freeware alternatives are available (for example, SharpKeys). To map Scroll Lock to the Win key in TradeKeys, choose Scroll Lock in the "Map from" list and Left Windows in the "Map to" list; click on Map, then OK, and either restart Windows or log out and log in again.
Note: A visitor recommends the free AutoHotKey as an alternative method of remapping the keyboard; apparently you can create a simple text file reading "LWin:ScrollLock" that AutoHotKey can run at startup. I have not tested this program.
This section is of interest only to those who use this site's method of starting WPDOS from the Windows Explorer right-click ("context") menu. (Wait! What exactly does "right-click" mean?) To use these instructions, you must understand the concept of an "example"! If you do not know what an "example" means, stop now and do something else!
When you launch WPDOS from the Windows Explorer right-click ("context") menu, Tame uses its default display settings, not the settings that you have specified for your desktop WPDOS shortcut. If you want Tame - when launched WPDOS from the right-click menu - to use the same underlines, italics, window size, and other settings that you use when WPDOS is launched from a desktop shortcut, then perform the following steps:
Start WPDOS from your desktop shortcut or whatever other method you normally use when launching WPDOS. If you want, resize the screen or make any other changes that you want to use when viewing WPDOS under Tame. From the Tame menu, choose User Preference Files, then click Save View Settings Now. Then open the Tame menu again, choose User Preference Files, then Options Specific to This Shortcut, and note the name of the .pif file that you will find in that same menu item. (Depending on your version of Tame, you may need to explore the menu system to find this item.) Close WPDOS.
Go to your My Documents folder, then the Tame 6.0 folder, then the SavedOptions folder. The files there should include one named
<whatever name you found listed on the Tame menu>.view.tam
Remember that the string shown above between angle brackets is only an example! You will not actually find the string that appears between angle brackets! Make sure you understand this essential concept! Instead of the string shown above within angle brackets, you will find the name of an actual .pif file!
If (and only if) you also see a file in the same folder named _default.pif.view.tam (note the underscore character at the beginning of the filename), then rename that file to something like Backup_default.pif.view.tam but do not be worried if you do not find that file there!
Make a copy of the file named <whatever name you found listed on the Tame menu>.view.tam (and remember that the string within angle brackets is only an example!). Rename the copy
_default.pif.view.tam
Make sure to use an underscore character as the first character in the filename!
Now, when you open WPDOS from the right-click context menu, the same view settings that Tame uses for your desktop shortcut should also be used.
Note: Your WordPerfect settings for Tame will now be used as the Tame settings for any DOS prompt, but this probably will not cause you any inconvenience.
WordPerfect for DOS can appear in a number of different modes. If you do not understand what is meant by WordPerfect's "text mode" and "graphics mode," or by the "windowed" and "full-screen" modes that WP can use under Microsoft Windows, click on the following links for illustrations:
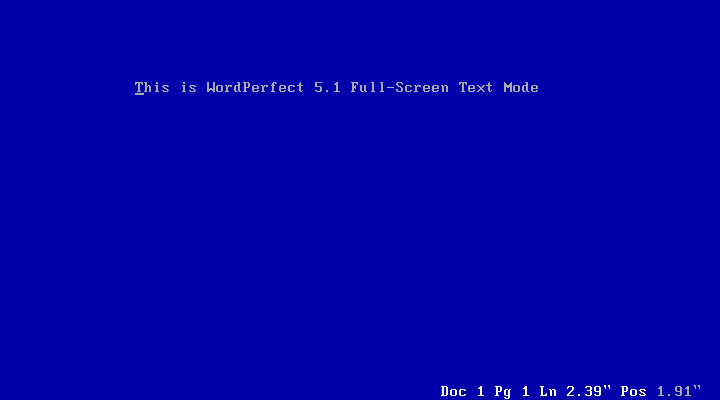
This is WordPerfect's Text Mode running in a window under Microsoft Windows.
This is WordPerfect's Text Mode running full-screen so that nothing else is visible on screen (as it appeared under MS-DOS).
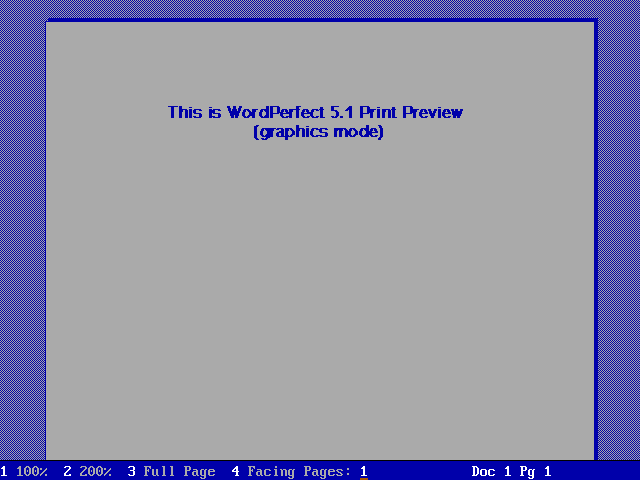
This is an example of WordPerfect's Graphics mode (in this instance, WPDOS 5.1 Print Preview).